
手写Qwen3-0.6B推理
一文了解LLM推理底层逻辑,手写推理demo
手写Qwen3-0.6B推理
简介
本文将使用Pytorch从0手写Qwen3-0.6B推理demo,包含Qwen3-0.6B模型结构分析理解 、实现Qwen3-0.6B整体结构、实现分组注意力机制与旋转位置编码等重要内容,附有github仓库,包含jupyter notebook等文件供交互式运行。github仓库链接如下:https://github.com/ComistryMo/Inference_demo
主要内容
下载模型
!hf download Qwen/Qwen3-0.6B --local-dir ./Qwen3-0.6B如果无法下载,可以使用hf-mirror代理进行下载
打印模型结构
from safetensors.torch import load_file
state_dict = load_file('./Qwen3-0.6B/model.safetensors')
for k,p in state_dict.items():
	print(f"key:{k} shape:{p.shape}")
使用本段代码可以打印出模型的结构,具体如下:
key:lm_head.weight shape:torch.Size([151936, 1024])
key:model.embed_tokens.weight shape:torch.Size([151936, 1024])
key:model.layers.0.input_layernorm.weight shape:torch.Size([1024])
key:model.layers.0.mlp.down_proj.weight shape:torch.Size([1024, 3072])
key:model.layers.0.mlp.gate_proj.weight shape:torch.Size([3072, 1024])
key:model.layers.0.mlp.up_proj.weight shape:torch.Size([3072, 1024])
key:model.layers.0.post_attention_layernorm.weight shape:torch.Size([1024])
key:model.layers.0.self_attn.k_norm.weight shape:torch.Size([128])
key:model.layers.0.self_attn.k_proj.weight shape:torch.Size([1024, 1024])
key:model.layers.0.self_attn.o_proj.weight shape:torch.Size([1024, 2048])
key:model.layers.0.self_attn.q_norm.weight shape:torch.Size([128])
key:model.layers.0.self_attn.q_proj.weight shape:torch.Size([2048, 1024])
key:model.layers.0.self_attn.v_proj.weight shape:torch.Size([1024, 1024])
key:model.layers.1.input_layernorm.weight shape:torch.Size([1024])
key:model.layers.1.mlp.down_proj.weight shape:torch.Size([1024, 3072])
key:model.layers.1.mlp.gate_proj.weight shape:torch.Size([3072, 1024])
key:model.layers.1.mlp.up_proj.weight shape:torch.Size([3072, 1024])
key:model.layers.1.post_attention_layernorm.weight shape:torch.Size([1024])
key:model.layers.1.self_attn.k_norm.weight shape:torch.Size([128])
key:model.layers.1.self_attn.k_proj.weight shape:torch.Size([1024, 1024])
key:model.layers.1.self_attn.o_proj.weight shape:torch.Size([1024, 2048])
key:model.layers.1.self_attn.q_norm.weight shape:torch.Size([128])
key:model.layers.1.self_attn.q_proj.weight shape:torch.Size([2048, 1024])
key:model.layers.1.self_attn.v_proj.weight shape:torch.Size([1024, 1024])
key:model.layers.10.input_layernorm.weight shape:torch.Size([1024])
...
key:model.layers.9.self_attn.q_norm.weight shape:torch.Size([128])
key:model.layers.9.self_attn.q_proj.weight shape:torch.Size([2048, 1024])
key:model.layers.9.self_attn.v_proj.weight shape:torch.Size([1024, 1024])
key:model.norm.weight shape:torch.Size([1024])
由于内容太长,打印出的信息会被折叠,但仍可以对整个模型的架构一探究竟:
- lm_head:这是模型最外层的头部,负责输出,为线性变换,主要将模型输出映射为词表概率,shape为[vocab_size, hidden_size]
- model:除了lm_head,其余层都有前缀model,我们依次拆解:
- embed_tokens:处理词嵌入,将token转化为张量,shape为[vocab_size, hidden_size]
- norm:归一化,shape为[hidden_size]
- layers:也就是Decoder块,仔细拆解每个Decoder内部的结构:
- input_layernorm:对输入参数作归一化,shape为[hidden_size]
- mlp:是FFN层,包含三个线性变换部分
- self_attn:自注意力模块,包含QKV相关参数
- proj:也就是常说的QKV矩阵,shape为[hidden_size, hidden_size],由于Qwen3使用分组注意力机制(GQA),Q有16个头,KV为8头,每两个Q共享一组KV,因此在计算时Q的维度需要改变为[num_attention_heads/num_key_value_heads*hidden_size, hidden_size]。o_proj为输出投影,将softmax的结果投影为原维度
- norm:仅对QK归一化,在每个头内部发生,因此shape为[head_dim]
- post_attention_layernorm:注意力之后,FFN之前的归一化,shape为[hidden_size]
打印模型结构(详细)
可以使用一份更详细的代码来进行输出,可以看到模型名称,大小等额外信息,这里不再展示,view_model.py详见github仓库:
from view_model import view_model_info
view_model_info("./Qwen3-0.6B/")
定义模型结构
目前我们已经了解了Qwen3-0.6B模型的结构,我们需要手动实现整个架构,才能将模型权重正确地加载。在这里我们遵循由整体到局部的原则进行实现:
Qwen3Model
根据我们上述打印出来的模型结构,可以看到整体上我们有model、lm_head两部分,model中又分为norm、embed_tokens、layers几部分,我们编码如下:
from transformers import AutoConfig
import torch
import torch.nn as nn
import torch.nn.functional as F

class Qwen3Model(nn.Module):
	def __init__(self, config):
		print("begin init model")
		super().__init__()
		self.config = config
		self.embed_tokens = nn.Embedding(config.vocab_size, config.hidden_size)
		self.layers = nn.ModuleList([Qwen3DecoderLayer(config) for _ in range(config.num_hidden_layers)])
		self.norm = Qwen3RMSNorm(config.hidden_size)
		self.lm_head = nn.Linear(config.hidden_size, config.vocab_size, bias=False)
self.lm_head.weight = self.embed_tokens.weight- 所有类均继承nn.Module
- embed_tokens使用nn提供的Embedding层实现
- layers也就是解码器层,我们手动在后续部分实现
- norm我们手动在后续部分实现
- lm_head为线性层,与embed_tokens共享权重 实现Qwen3Model的forward函数:
def forward(self, input_ids):
	bsz, q_len = input_ids.shape
	pos_ids = torch.arange(q_len, dtype=torch.long, device=input_ids.device).unsqueeze(0)
	casual_mask = torch.triu(
		torch.full((q_len, q_len), float('-inf'), dtype=torch.float32, device=input_ids.device),
		diagonal=1
	).unsqueeze(0).unsqueeze(0).expand(bsz, 1, q_len, q_len)

	hidden_states = self.embed_tokens(input_ids)
	for layer in self.layers:
		hidden_states = layer(hidden_states, pos_ids=pos_ids, attn_mask=casual_mask)
	hidden_states = self.norm(hidden_states)
	logits = self.lm_head(hidden_states)
return logits- 在forward函数中,我们实际上完成的是推理的过程,我们接受输入为input_ids,这是分词的结果,我们首先通过embed_tokens转换为隐藏层向量,然后依次经过解码器层,通过归一化后经过lm_head输出得到logits,留作解码使用。详细过程参考本图:

- pos_ids我们需要使用一次unsqueeze来扩充到(1, q_len)的维度,方便广播
- 因为Qwen3使用的是GQA,我们的mask需要做两次维度的扩张以适配头数,第0维对应batchsize,第1维对应head
Qwen3DecoderLayer
在实现了整体模型架构后,我们由外向内,发现其余均为解码器层,对解码器进行分析,其中包含input_layernorm、mlp、self_attn、post_attention_layernorm,我们编码如下:
class Qwen3DecoderLayer(nn.Module):
	def __init__(self, config):
		super().__init__()
		self.self_attn = Attention(config)
		self.post_attention_layernorm = Qwen3RMSNorm(config.hidden_size)
		self.mlp = MLP(config)
		self.input_layernorm = Qwen3RMSNorm(config.hidden_size)

	def forward(self, hidden_states, pos_ids=None, attn_mask=None):
		residual = hidden_states
		hidden_states = self.input_layernorm(hidden_states)
		hidden_states = self.self_attn(hidden_states, pos_ids, attn_mask)
		hidden_states = residual + hidden_states
		residual = hidden_states
		hidden_states = self.post_attention_layernorm(hidden_states)
		hidden_states = self.mlp(hidden_states)
		hidden_states = residual + hidden_states
return hidden_states- 解码器的流程图如下,参考图片可以很容易的理解代码:

Qwen3RMSNorm
RMSNorm应用在各个地方,收到的参数大小有时候为config.head_dim,有时候为config.hidden_size,因此不直接接收config参数,而是将经过的参数大小进行传入,编码如下:
class Qwen3RMSNorm(nn.Module):
	def __init__(self, hidden_size, eps=1e-6):
		super().__init__()
		self.weight = nn.Parameter(torch.ones(hidden_size))
		self.eps = eps

	def forward(self, hidden_states):
		input_dtype = hidden_states.dtype
		hidden_states = hidden_states.to(torch.float32)
		var = hidden_states.pow(2).mean(-1, keepdim=True)
		hidden_states = hidden_states * torch.rsqrt(var + self.eps)
		rms_res = self.weight * hidden_states.to(input_dtype)
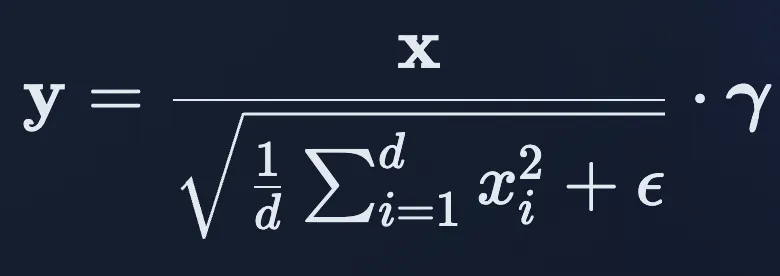
return rms_res- RMSNorm公式如下:
Attention
在DecoderLayer中,最重要的一部分就是Attention,在这里我们实现GQA,编码如下:
class Attention(nn.Module):
	def __init__(self, config):
		super().__init__()
		self.hidden_size = config.hidden_size
		self.num_heads = config.num_attention_heads
		self.num_kv_heads = config.num_key_value_heads
		self.head_dim = config.head_dim
		self.num_kv_groups = self.num_heads // self.num_kv_heads
		self.q_proj = nn.Linear(self.hidden_size, self.num_heads * self.head_dim, bias=False)
		self.k_proj = nn.Linear(self.hidden_size, self.num_kv_heads * self.head_dim, bias=False)
		self.v_proj = nn.Linear(self.hidden_size, self.num_kv_heads * self.head_dim, bias=False)
		self.o_proj = nn.Linear(self.num_heads * self.head_dim, self.hidden_size, bias=False)
		self.q_norm = Qwen3RMSNorm(config.head_dim, eps=config.rms_norm_eps)
		self.k_norm = Qwen3RMSNorm(config.head_dim, eps=config.rms_norm_eps)
self.rope_theta = config.rope_theta- 在GQA中,一组KV对应多个Q,KV的group数为num_heads // num_kv_heads
- 对于q_proj,我们应该将输入映射到self.num_heads * self.head_dim的大小,因为有self.num_heads个Q,每个Q都对应一个self.head_dim
- 对于k_proj和v_proj,我们应该将输入映射到self.num_kv_heads * self.head_dim的大小,因为有self.num_kv_heads组KV,每组KV都对应一个self.head_dim
- QK的归一化发生在每个head内部,因此大小为self.head_dim即可 GQA的forward函数:
def forward(self, hidden_states, pos_ids=None, attn_mask=None):
	bsz, q_len, _ = hidden_states.size()
	q = self.q_proj(hidden_states).view(bsz, q_len, self.num_heads, self.head_dim).transpose(1, 2)
	k = self.k_proj(hidden_states).view(bsz, q_len, self.num_kv_heads, self.head_dim).transpose(1, 2)
	v = self.v_proj(hidden_states).view(bsz, q_len, self.num_kv_heads, self.head_dim).transpose(1, 2)

	q = self.q_norm(q)
	k = self.k_norm(k)
	q, k = apply_rope(q, k, pos_ids, self.head_dim, self.rope_theta)

	if self.num_kv_groups > 1:
		k = k.unsqueeze(2).expand(-1, -1, self.num_kv_groups, -1, -1).flatten(1, 2)
		v = v.unsqueeze(2).expand(-1, -1, self.num_kv_groups, -1, -1).flatten(1, 2)

	attn_score = torch.matmul(q, k.transpose(-2, -1)) / (self.head_dim ** 0.5)

	if attn_mask is not None:
		attn_score = attn_score + attn_mask

	attn_score = torch.softmax(attn_score, dim=-1, dtype=torch.float32).to(hidden_states.dtype)
	attn_output = torch.matmul(attn_score, v)
	attn_output = attn_output.transpose(1, 2).contiguous().view(bsz, q_len, -1)
	attn_output = self.o_proj(attn_output)
return attn_output- GQA的流程如下:
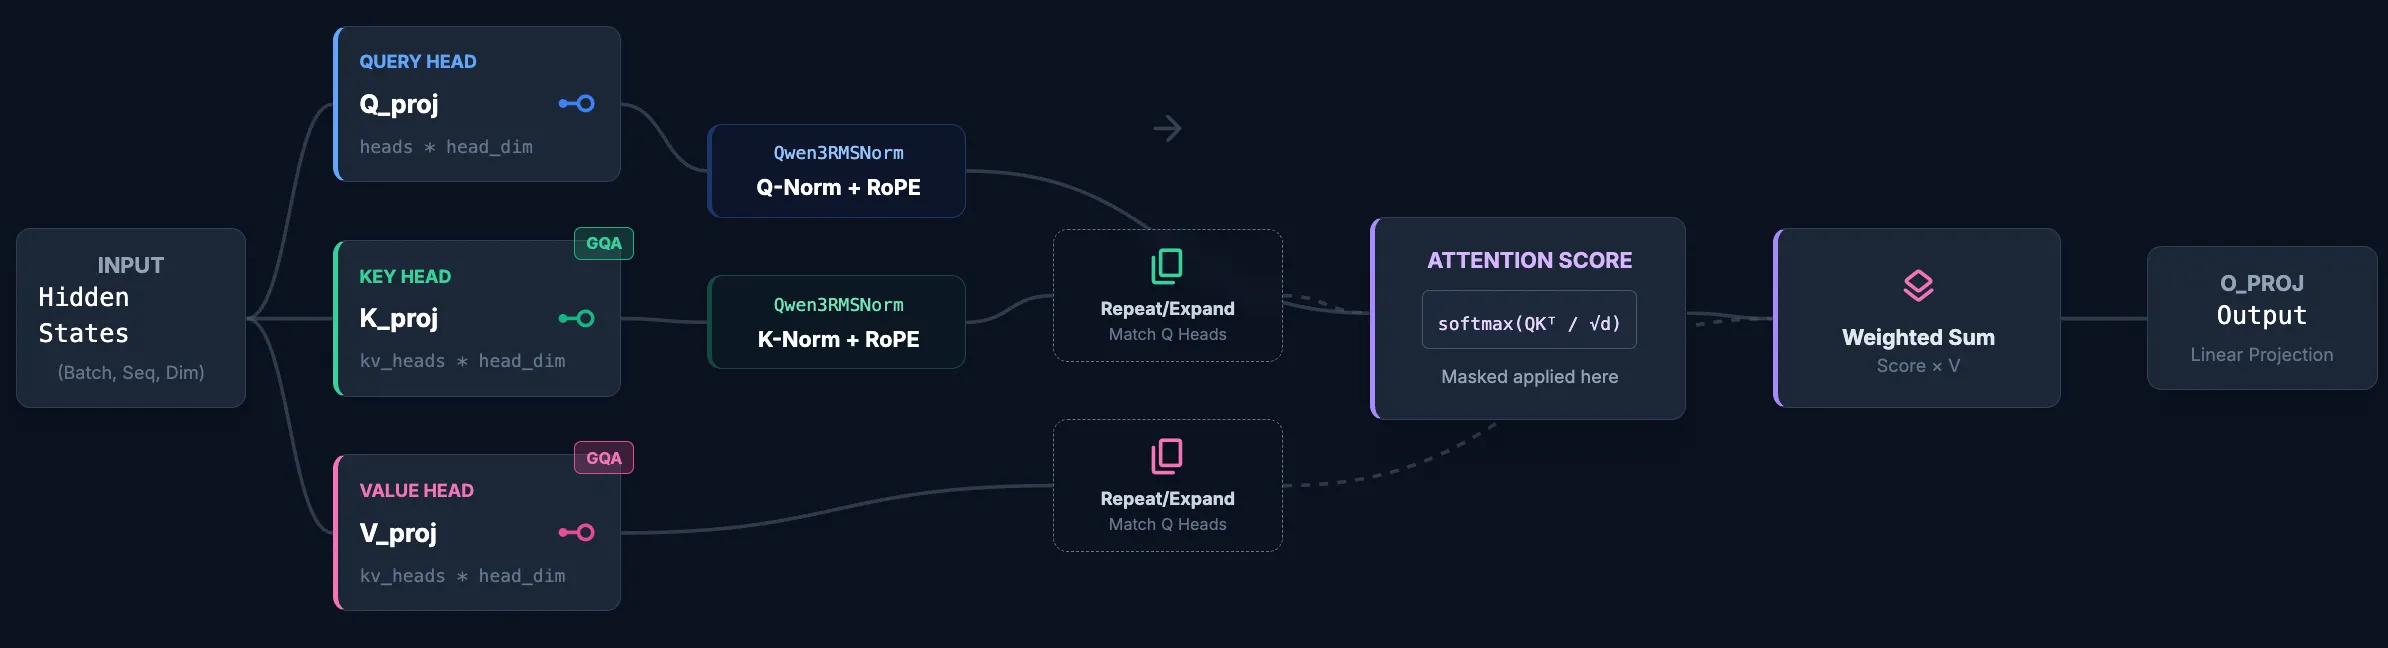
- 我们的输入size是(bsz, q_len, hidden_size),经过q_proj后,变为(bsz, q_len, self.num_heads * self.head_dim),使用view后变为(bsz, q_len, self.num_heads, self.head_dim),transpose后为(bsz, self.num_heads, q_len, self.head_dim),这是为了方便在头的内部进行广播。对KV的操作同理
- 如果groups大于1,也就是在GQA或者MQA场景下,我们需要对齐维度,才能进行点积运算,具体我们就是将KV头复制/广播,使其数量对齐Q头。
- 简单理解就是KV的size本来为(bsz, self.num_kv_heads, q_len, self.head_dim),相比于Q的size为(bsz, self.num_heads, q_len, self.head_dim),在第1维度上不对齐,两个参数之间的关系为self.num_kv_groups = self.num_heads // self.num_kv_heads。因此我们在对齐的代码实现上,首先插入一个新的维度,大小为self.num_kv_groups,通过flatten操作将第1、2维度展平,新的第1维度大小就和Q的维度完成了对齐。
- 在完成运算后,我们首先将之前颠倒的1、2维度复原,然后再将之前拆开的hidden_size拼好,最后通过o_proj返回GQA的结果
Rope
def apply_rope(q, k, position_ids, head_dim, rope_theta=1000000.0):
	device = q.device
	inv_freq = 1.0 / (rope_theta ** (torch.arange(0, head_dim, 2, dtype=torch.float32, device=device) / head_dim))
	freqs = position_ids.unsqueeze(-1).float() * inv_freq.unsqueeze(0).unsqueeze(0)
	emb = torch.cat([freqs, freqs], dim=-1)
	cos = emb.cos().unsqueeze(1).to(q.dtype)
	sin = emb.sin().unsqueeze(1).to(q.dtype)

	def rotate_half(x):
		x1, x2 = x.chunk(2, dim=-1)
		return torch.cat((-x2, x1), dim=-1)

	q_embed = (q * cos) + (rotate_half(q) * sin)
	k_embed = (k * cos) + (rotate_half(k) * sin)
return q_embed, k_embed- Rope此处不作讲解,后续写文章讨论,篇幅较长
MLP
class MLP(nn.Module):
	def __init__(self, config):
		super().__init__()
		self.gate_proj = nn.Linear(config.hidden_size, config.intermediate_size, bias=False)
		self.up_proj = nn.Linear(config.hidden_size, config.intermediate_size, bias=False)
		self.down_proj = nn.Linear(config.intermediate_size, config.hidden_size, bias=False)

	def forward(self, x):
		ret = self.down_proj(F.silu(self.gate_proj(x)) * self.up_proj(x))
return ret- MLP部分为三个线性层,按流程计算即可
推理
在实现完上述的架构之后,我们只需要将权重load进去,即可进行推理过程:
from tokenizers import Tokenizer
config = AutoConfig.from_pretrained("./Qwen3-0.6B/")
model = Qwen3Model(config)
new_state_dict = {}
for k, v in state_dict.items():
	if k.startswith("model."):
		new_state_dict[k[len("model") + 1:]] = v
	else:
		new_state_dict[k] = v

model.load_state_dict(new_state_dict, strict=True)
model.eval()

tokenizer = Tokenizer.from_file(str("./Qwen3-0.6B/tokenizer.json"))
message="<|im_start|>user你好,我是ComistryMo,请多指教!<|im_end|><|im_start|>assistant"
input_ids = tokenizer.encode(message).ids
input_ids = torch.tensor([input_ids], dtype=torch.long)
with torch.no_grad():
	while True:
		logits = model(input_ids)
		next_token = torch.argmax(logits[:, -1, :], dim=-1, keepdim=True)
		if next_token.item() == 151645:
			break
		input_ids = torch.cat([input_ids, next_token], dim=1)

output_text = tokenizer.decode(input_ids[0].tolist(), skip_special_tokens=True)
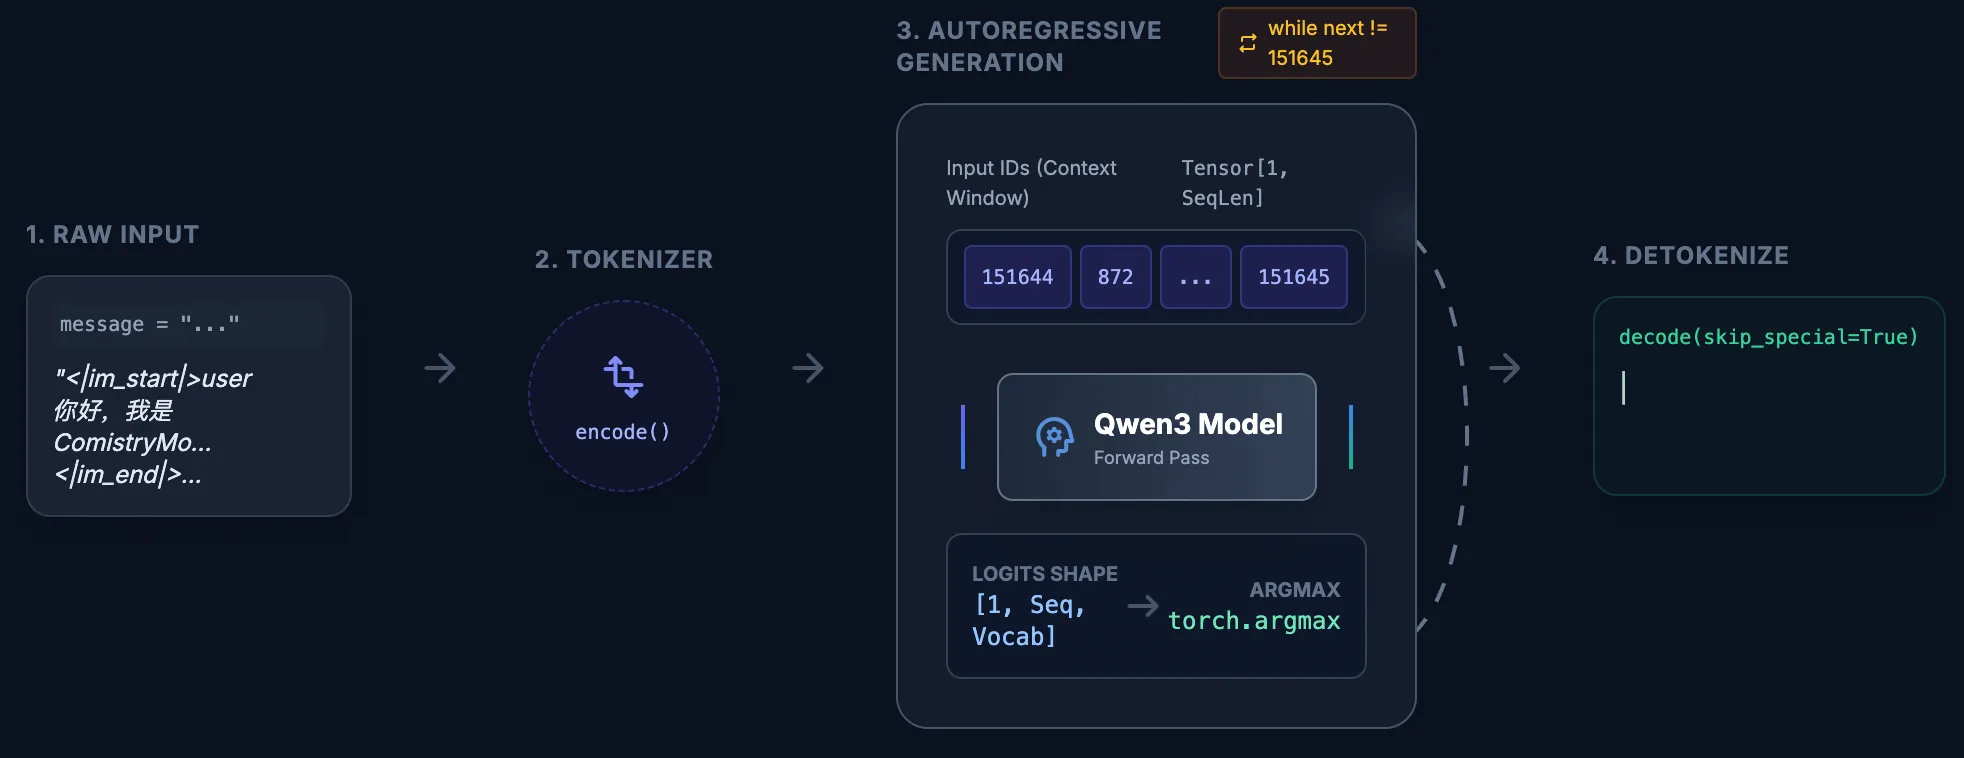
print(output_text)- 流程如下:
 最终结果如下:
begin init model
user你好,我是ComistryMo,请多指教!assistant<think>
<think>
好的,用户是ComistryMo,看起来像是一个化妆品品牌或者相关领域的用户。首先,我需要确认用户的具体需求。用户可能是在询问关于化妆品的使用方法、产品推荐,或者遇到了一些问题。由于用户没有提供详细的问题,我需要保持友好和开放的态度,引导他们更具体地说明问题。
接下来,我应该考虑如何回应。用户可能希望得到帮助,但需要先了解他们的具体需求。因此,我可以用友好的方式询问,比如“有什么可以帮助你的吗?”或者“需要我帮你解答什么问题吗?”这样可以确保用户能够提供更多信息,从而提供更准确的帮助。
同时,我需要确保回应的语气专业且亲切,让用户感到被重视。避免使用过于技术化的术语,让用户容易理解和接受。此外,保持回答简洁明了,避免冗长,让用户能够快速获取所需的信息。
最后,检查是否有遗漏的信息,确保回答全面且符合用户的需求。如果用户有其他问题,可能需要进一步引导他们,以确保问题得到充分的解答。
</think>

你好!我是ComistryMo,有什么可以帮助你的吗?😊 如果你有任何问题或需要帮助,比如产品使用、产品推荐,或者遇到任何问题,随时告诉我哦!
与官方的性能对比
代码如下:
import time
import torch
from tokenizers import Tokenizer
from transformers import AutoConfig, AutoModelForCausalLM
from safetensors.torch import load_file

device = "cuda" if torch.cuda.is_available() else "cpu"
path = "./Qwen3-0.6B/"

config = AutoConfig.from_pretrained(path)
my_model = Qwen3Model(config).to(device)

state_dict = load_file(f"{path}/model.safetensors", device=device)
new_state_dict = {}
for k, v in state_dict.items():
    if k.startswith("model."):
        new_state_dict[k[len("model") + 1:]] = v
    else:
        new_state_dict[k] = v
my_model.load_state_dict(new_state_dict, strict=True)
my_model.eval()

official_model = AutoModelForCausalLM.from_pretrained(
    path,
    torch_dtype=torch.float16 if device == "cuda" else torch.float32,
    trust_remote_code=True
).to(device)
official_model.eval()

tokenizer = Tokenizer.from_file(str(f"{path}/tokenizer.json"))
message = "<|im_start|>user你好,我是ComistryMo,请多指教!<|im_end|><|im_start|>assistant"
input_ids_raw = tokenizer.encode(message).ids
input_ids = torch.tensor([input_ids_raw], dtype=torch.long).to(device)

def measure_time(func, name):
    # 预热一次,防止第一次运行包含了初始化开销
    print(f"正在预热 {name}...")
    if device == "cuda":
        torch.cuda.synchronize()

    start = time.perf_counter()
    result = func()

    if device == "cuda":
        torch.cuda.synchronize()
    end = time.perf_counter()

    elapsed = end - start
    print(f"[{name}] 耗时: {elapsed:.4f} 秒")
    return result

def run_my_inference():
    curr_input = input_ids.clone()
    with torch.no_grad():
        while True:
            logits = my_model(curr_input)
            next_token = torch.argmax(logits[:, -1, :], dim=-1, keepdim=True)
            if next_token.item() == 151645:
                break

            curr_input = torch.cat([curr_input, next_token], dim=1)

            if curr_input.shape[1] > 200:
                break
    return tokenizer.decode(curr_input[0].tolist(), skip_special_tokens=True)

def run_official_inference():
    with torch.no_grad():
        output = official_model.generate(
            input_ids,
            max_new_tokens=200,
            eos_token_id=151645,
            pad_token_id=151645,
            use_cache=True
        )
    return tokenizer.decode(output[0].tolist(), skip_special_tokens=True)

print("--- 开始对比 ---")
output_my = measure_time(run_my_inference, "手动推理 (无KV Cache)")
output_official = measure_time(run_official_inference, "官方推理 (有KV Cache)")

print("\n--- 结果验证 ---")
print(f"手动结果长度: {len(output_my)}")
print(f"官方结果长度: {len(output_official)}")- 在开启官方的kv_cache下,结果如下:
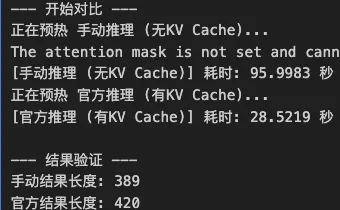
- 若关闭kv_cache,结果则变为手动推理耗时79.4075秒,官方耗时54.9702秒
- 可以看到kv_cache带来的影响还是很大的,后续会实现带kv_cache版的推理demo以及多模态大模型的推理demo